Background
Role of Unit Testing in a Web Application
Suppose you are creating a web application that implements a significant feature set in its initial release, and suppose your design team anticipates growing and improving the features in successive releases. You want to build quality in from the start. Looking ahead, you want to be able to refactor code fearlessly as the design evolves. Unit testing can help you accomplish those objectives. This paper discusses ways to resolve incompatibilities between a particular testing tool and a particular web application development tool.
What Is Saxon-JS?
Saxon-JS is a product from Saxonica that runs XSLT in a browser[1] using JavaScript. In a typical architecture of a web application for use with Saxon-JS, your source code comes in two parts: an XSLT transform and an HTML file. You use another Saxonica product called Saxon-EE to compile your XSLT code to a separate file that is known as a stylesheet export file. In your HTML file, you include JavaScript code that directs Saxon-JS to that stylesheet export file. When the browser renders the HTML page, it calls Saxon-JS, which implements your XSLT transform by running JavaScript code that is part of the Saxon-JS product. For a diagram of this architecture, see [S1].
To help you create interactive web applications, Saxon-JS includes a suite of what it calls interactive XSLT extensions. These extensions help you connect your XSLT code with the larger context of the web application. For example, you can use interactive XSLT extensions in your XSLT code to respond to the user's mouse clicks, obtain the URL query string, schedule asynchronous calls to named XSLT templates, execute custom JavaScript code, or change the values of HTML attributes currently being rendered in the browser.
What Is XSpec?
XSpec is an open-source software product for testing XSLT, XQuery, and Schematron code. An XSpec test suite is an XML document that conforms to the XSpec schema. When writing an XSpec test suite, you set up test scenarios (or "tests") and express the results you expect. When you run an XSpec test suite, the software evaluates the test scenarios, gathers results, and generates a report that compares the actual results to the expected ones. You can view the report as HTML in a browser, or you can programmatically operate on the same information in textual or XML format. An XSpec test suite can include multiple test scenarios, each of which can make multiple assertions about expected results.
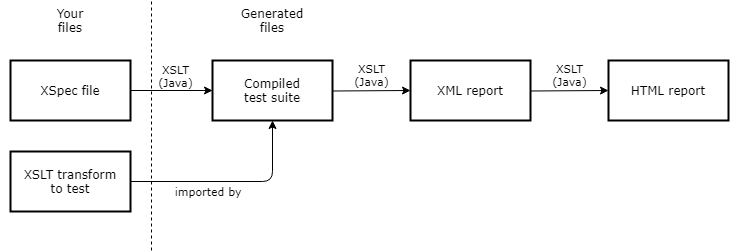
Here is a bit more detail about what happens when you run an XSpec test suite to test
XSLT code. First, the XSpec infrastructure uses XSLT to compile your XSpec test suite
into a
new XSLT transform. This compiled test suite incorporates all the logic from your
test suite
and also uses <xsl:import> to import the XSLT you are testing. Next, the
compiled test suite runs and produces an XML report that is further transformed into
an HTML
report. Execution of the compiled test suite uses Saxon on the Java platform,
not the JavaScript platform running in a Web browser.
Figure 1: XSpec Compilation
The XSpec package also includes functionality for computing and reporting on code coverage.
Motivation: Areas of Incompatibility Between XSpec and Saxon-JS
Case Study for This Paper
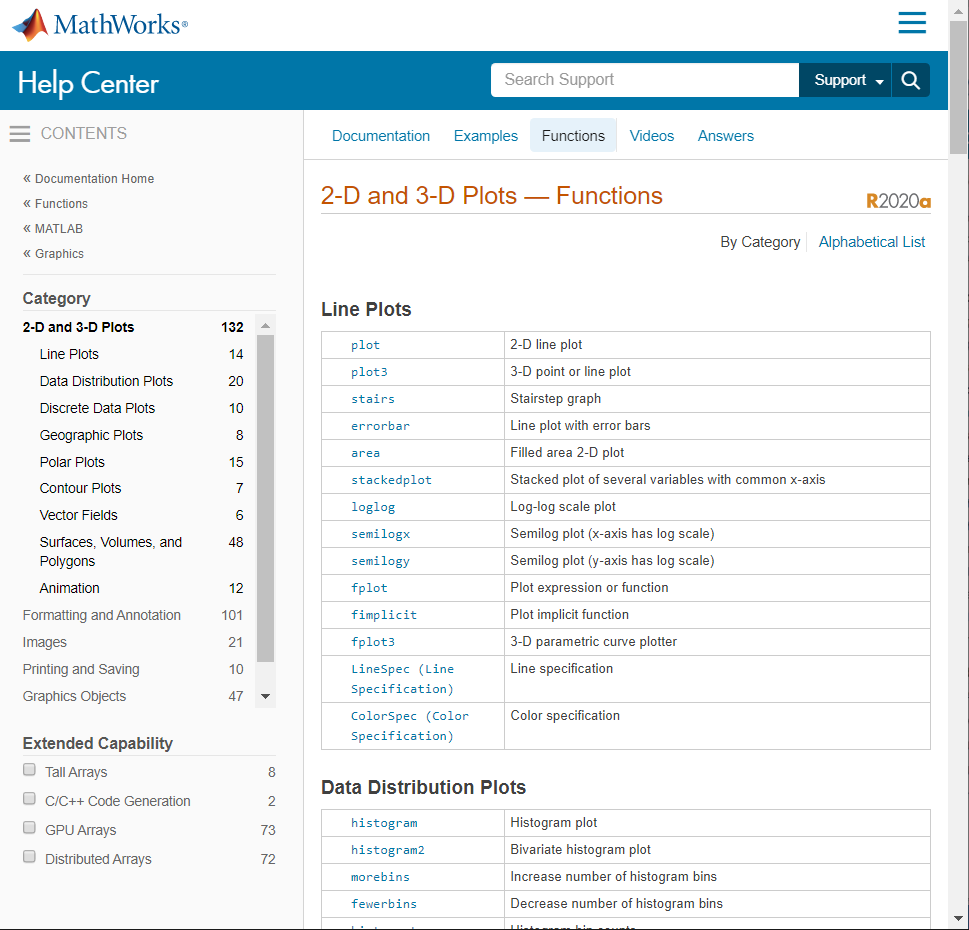
While we expect the techniques and commentary in this paper to have broader applicability, we developed them while working on a specific Saxon-JS (version 1.2) web application at a software company. The application displays lists of software language items (functions, methods, and so on) in a suite of approximately 100 products. Each item in the list shows the hyperlinked name of a function or other language item next to a one-line summary. The application enables the end user to:
-
Vary the scope of the list: across all products, within one product, or in a user-selectable category within one product.
-
Switch the display between alphabetical and categorized views.
-
Filter the list to show only language items that support certain data types or extended capabilities.
-
Switch among functions and other kinds of language items while maintaining prior choices, such as a previously selected product or category.
Any choices that the user can make interactively are also reflected in the URL query string, making the choices easy to access programmatically during testing.
In this application, selecting the correct data to display based on those choices is critical. The graphical controls are important, too, but animation is neither flashy nor the primary focus of the application. These aspects of the application's nature influenced the unit-testing strategy, as later sections describe.
The next screen capture shows a sample in which the application renders a categorized view of a subset of functions within one product [M].
Figure 2: Sample View of Case Study Application
Types of Incompatibilities
During development of the web application, we soon discovered that certain key traits of a Saxon-JS web application cause XSpec to issue error messages. For example:
-
A recommended programming paradigm in Saxon-JS web applications uses the
<xsl:result-document>instruction to replace or augment the content of an element in the HTML page. The content of the<xsl:result-document>instruction is evaluated, and the result is inserted into the content of the element in question [S2]. This paradigm poses two challenges for XSpec. First, the XSpec implementation uses<xsl:result-document>to capture the test results, and<xsl:result-document>instructions cannot nest. Using<xsl:result-document>in the XSLT code being tested causes XSpec to issue an error message. Second, XSpec does not have access to the HTML page that the result is supposed to be inserted into. As a result, XSpec cannot act on the<xsl:result-document>instruction in the manner that Saxon-JS does within the browser. -
The interactive XSLT extension functions in Saxon-JS are inaccessible to XSpec. This leads to various problems. For instance, our web application needs to access parameters in the URL query string. Saxon-JS provides the
ixsl:query-paramsfunction for this purpose, as part of the interactive XSLT suite of extensions. However, XSpec has no access to the query string, URL, or theixsl:query-paramsfunction. -
Like the extension functions, extension instructions are unknown to XSpec. This, too, leads to problems. Our application populates sections of the page incrementally as their content is ready, as opposed to taking the time to compute all the content before starting to render it. Saxon-JS provides the
<ixsl:schedule-action>extension instruction for this purpose. Lacking this instruction, XSpec is unable to schedule actions for later execution and does not even understand the request.
Having successfully used XSpec for testing other parts of our XSLT code base, we wanted to have unit testing for the web application, too. The rest of this paper describes the approach we used for testing this Saxon-JS application using XSpec, an alternative approach that we explored but did not use, and the reasons for our choice.
Primary Approach: Substitute as Needed
In software testing parlance, the term mocking describes a technique in which you provide substitutes for functionality or data that you cannot or prefer not to use in a testing process. For example, suppose you are testing part of an e-commerce application that performs transactions, and you want to check that a customer survey appears after the transaction is complete. You cannot make real purchases in the test environment. Instead, you might substitute a fake account, perform the transaction there, and check that the survey appears. Going one step further from the real situation, you might substitute a fake transaction handler that does not even attempt to access an account but merely sends back a reply indicating what the real handler would have done. This reply might be good enough, because the purpose of this test is to check that the survey appears, not to manipulate a real or fake account. How closely the mock behavior should imitate reality is a choice you make, depending on what you want to accomplish.
We substituted mock behaviors for the behaviors our actual web application performed that XSpec could not perform: creating result documents to change the HTML content of the page, calling interactive XSLT extension functions, and executing interactive XSLT extension instructions. What we were able to test using XSpec included logic and data processing operations. These operations were the core of our application, so we were satisfied that XSpec was applicable there.
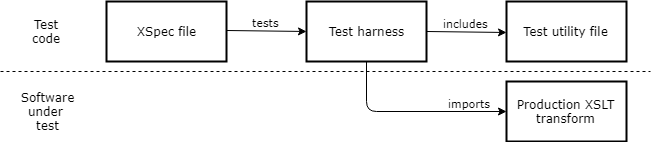
High-Level File Structure to Enable Substitution
XSLT import precedence provides a straightforward architecture for many of the substitutions we needed. Instead of making the XSpec file directly test the production XSLT transform, we used the following set of files:
-
Production XSLT transform, used in the live application.
-
Test utility file, an XSLT file containing the templates and functions for XSpec to use when substituting for Saxon-JS behaviors. This file can potentially be shared by multiple Saxon-JS applications, if their testing requirements are similar enough.
-
Test harness, an XSLT file that uses an
<xsl:include>element to include the test utility file and an<xsl:import>element to import the production XSLT transform. -
XSpec file, where the
stylesheetattribute on the top-level element points to the test harness file, not the production XSLT transform. This attribute value and the use of an<xsl:import>element in the test harness ensure that XSpec uses the templates and functions in the test utility file, not their counterparts in the production XSLT transform.
Figure 3: High-Level File Structure
Alternatively, an XSpec element named <x:helper>, implemented but not
yet released as of this writing, will enable you to achieve the same result without
requiring a test harness as a separate file.
Case 1: Creating Result Documents
As stated earlier, Saxon-JS applications commonly use
<xsl:result-document> instructions to replace or augment the content of an
element in the HTML page, but XSpec has no HTML page at its disposal. We created a
named
template that, in production, does nothing but execute <xsl:result-document>
instructions. The production XSLT transform consistently calls this named template
instead
of executing <xsl:result-document> instructions directly. The purpose of
this named template is to provide a level of indirection that enables substitution
for
testing purposes.
Figure 4: Production XSLT Transform's Wrapper for <xsl:result-document>
  <!-- Populate specified portion of the HTML page with specified content.
       The method param is 'ixsl:replace-content' or
       'ixsl:append-content'. -->
  <xsl:template name="mt:result-document" as="empty-sequence()">
    <xsl:param name="href" as="xs:string" required="yes"/>
    <xsl:param name="content" as="item()*" required="yes"/>
    <xsl:param name="method" as="xs:string" select="'ixsl:replace-content'"/>
    <xsl:result-document href="{$href}" method="{$method}">
      <xsl:sequence select="$content"/>
    </xsl:result-document>
  </xsl:template>
Our chosen substitute behavior is to emit a processing instruction followed by the
content that was
passed in. The processing instruction describes what would happen in production. The
next code excerpt
shows the test utility file's code for the mt:result-document template.
Figure 5: Test Utility File's Substitution for <xsl:result-document>
  <!-- Output a message and the content of the result document. -->
  <xsl:template name="mt:result-document" as="item()*">
    <xsl:param name="href" as="xs:string" required="yes"/>
    <xsl:param name="content" as="item()*" required="yes"/>
    <xsl:param name="method" as="xs:string" select="'ixsl:replace-content'"/>
    <xsl:processing-instruction name="tst" expand-text="yes">In production, would execute
      xsl:result-document href={$href}
      method={$method}
    </xsl:processing-instruction>
    <xsl:sequence select="$content"/>
  </xsl:template>
During XSpec testing, any XSLT code that calls the mt:result-document
template executes the testing version. This accomplishes two things: it avoids an
XSpec
error and it provides information that XSpec can verify. The following two
<x:expect> elements illustrate how XSpec can confirm our expectations
about content that the production XSLT transform inserts into the HTML page.
Figure 6: XSpec File's Verification Relying on Substitution for
<xsl:result-document>
<x:expect label="h1 gets populated" test="$x:result[1]">
  <?tst In production, would execute
    xsl:result-document href=#listpage_h1
    method=ixsl:replace-content
  ?>
</x:expect>
<x:expect label="with correct text."
  test="$x:result[2]" select="'Functions'"/>
These <x:expect> elements do not directly check that the HTML
<h1> element in the web application gets populated with the correct text.
Instead, they check for indirect indications that the web application behaves as expected.
Designing indirect indications that give you confidence about the production behavior
is
part of how you apply mocking techniques.
Still, it is possible to have defects in the <h1> element that these
XSpec assertions would not detect. For example, if the HTML page had no element with
id="listpage_h1" due to a bug, Saxon-JS would not find the spot on the page
to put the text content. XSpec would report that the XSLT code exhibited the expected
behavior, but the web application would still have a defect. Just because a defect
can go
undetected in a unit test, that does not mean the test is not worthwhile. When you
design
your testing strategy, factors you typically consider include:
-
How far you can get with unit-level tests that you can run frequently as you change the code.
-
The risk of gaps due to substitute behaviors.
-
The options for closing those gaps, such as interactive or system-level testing that exercises the web application in a browser, even if that level of testing is less convenient to perform frequently during code development.
Case 2: Calling an Extension Function
The test utility file contains substitute definitions of these interactive XSLT
functions that we use in production: ixsl:apply, ixsl:call,
ixsl:eval, ixsl:location, ixsl:page,
ixsl:query-params, and ixsl:window. Each substitute definition
has the same signature as the original function, documented at [S3]. We
added each of these substitute definitions to the test utility file as the need
arose.
Our substitute behaviors for Interactive XSLT extension functions have these goals:
-
Avoid an XSpec error.
-
(Optionally) Report that the function was called.
-
(Optionally) Return a mock value to use for verification.
For each goal, we offer an example showing where the goal applied and how we used code in the test utility file and XSpec file to accomplish the goal.
Goal 1: Avoid Error
For some extension functions, avoiding an XSpec error is sufficient. For example,
the
production XSLT transform calls the ixsl:location function only once, in the
definition of a global variable. The XSpec file overrides the global variable, which
means
that XSpec does not actually call ixsl:location (either the Saxonica function
or our substitute version in the test utility file) during testing. In this case,
the mere
presence of a substitute function prevents a static error during
testing. The content of the substitute function is irrelevant. Here
is the substitute function's definition:
Figure 7: Test Utility File's Substitution for ixsl:location
  <xsl:function name="ixsl:location" as="xs:string">
    <xsl:message terminate="yes">
      We should not get here, because calls to
      ixsl:location are done only in globals that the XSpec file overrides
    </xsl:message>
    <xsl:value-of select="''"/>
  </xsl:function>
An alternate approach to error avoidance involves the XSLT 3.0 instructions
<xsl:try> and <xsl:catch>. In the next example, the
production behavior changes the browser's URL history. We decided not to report or
mimic the URL change in the XSpec environment. The try/catch structure is enough to
remove
a barrier to XSpec testing of the ancestor template.
Figure 8: Production XSLT Transform's Use of Try/Catch Structure to Avoid Error
  <xsl:try>
    <xsl:sequence select="ixsl:window() => ixsl:call(
      'history.pushState',[$new_url,0,$new_url])"/>
    <xsl:catch/>
  </xsl:try>
Another alternate approach is to set a use-when attribute whose value is
a static parameter. The parameter's value is defined in the production XSLT transfor
as
true and defined in the test utility file as false.[2]
Goal 2: Report on Function Invocation
For some extension functions, we want XSpec to be able to confirm that the function
was called. For example, in exactly one spot, our production XSLT transform uses the
ixsl:apply function to call a JavaScript function. We want an XSpec test
scenario to check that ixsl:apply was called, but with only one instance, it
is not worth the effort to return details about the JavaScript function being called.
Besides, testing the specific result is a task for browser-based testing because only
the
browser can actually call the JavaScript function. The test utility file contains
the
following function definition:
Figure 9: Test Utility File's Substitution for ixsl:apply
  <xsl:function name="ixsl:apply" as="item()?">
    <xsl:param name="function" as="item()"/>
    <xsl:param name="arguments" as="array(*)"/>
    <xsl:processing-instruction name="tst">In production, would call JavaScript function</xsl:processing-instruction>
  </xsl:function>
This function definition enables an XSpec <x:expect> element, such as
the following, to verify the presence of the processing instruction. In this case,
the processing instruction happens to
be in the last item in the sequence of XSLT results that XSpec stores in its special
$x:result variable.
Figure 10: XSpec File's Verification Relying on Substitution for
ixsl:apply
  <x:expect
    label="Left nav scrolls to the correct product via JavaScript call."
    test="$x:result[last()]">
    <?tst In production, would call JavaScript function?>
  </x:expect>
Goal 3: Return Mock Result for Verification
For some extension functions, we want XSpec to obtain a mock return value that we
can
use to verify correct behavior. For example, in several spots, our production XSLT
transform uses the ixsl:page function at the start of an XPath expression. In
Saxon-JS, this function returns the document node of the HTML DOM document that the
browser is displaying. Starting an XPath expression from the returned document node
lets
you navigate the HTML tree to query or modify elements.
Because the ixsl:page function is such an important part of our
application, it is not enough to know that it was called. We want our unit test to
be able
to verify what happened next — for instance, whether subsequent code modified the
correct
element. For example, the following XSLT code excerpt uses the ixsl:page
function to identify a particular radio button newly inserted into the page. The code
sets
the checked attribute of the radio button. (For more about the template named
mt:set-attribute, see section “Case 3: Executing an Extension Instruction”.)
Figure 11: Production XSLT Transform Excerpt Using ixsl:page
  <!-- Mark the default active radio button. -->
  <!-- The ixsl:page() output reflects:
  - In the browser, the result of the mt:result-document call earlier
  - In XSpec, the fixed $html_el value. -->
  <xsl:for-each select="ixsl:page()//input
    [@name='blocktype']
    [@value=$configuration?blocktype]">
    <xsl:call-template name="mt:set-attribute">
      <xsl:with-param name="attrname" select="'checked'"/>
      <xsl:with-param name="attrvalue" select="''"/>
    </xsl:call-template>
  </xsl:for-each>
The XSpec environment has no access to an HTML DOM document. Instead, we need a
substitute ixsl:page function that operates on a substitute document and
returns its document node. Our solution is for the test utility file to define a global
parameter, html_el, whose override in the XSpec file captures the relevant
parts of the web application's HTML document. The substitute ixsl:page
function simply returns the root of this parameter value.
Figure 12: Test Utility File's Substitution for ixsl:page
  <xsl:param name="html_el" as="element()"/>

  [...]

  <xsl:function name="ixsl:page" as="node()">
    <xsl:sequence select="root($html_el)"/>
  </xsl:function>
Using the substitute ixsl:page function in the test utility file and a
representative html_el parameter defined in the XSpec file for this web
application, we can verify that the expected radio button has the checked
attribute.
Figure 13: XSpec File's Verification of an Operation Relying on ixsl:page
  <x:expect label="The 'All' radio button has 'checked' attribute"
    test="$x:result[3]">
    <input checked="" type="..." name="blocktype"
    value="all" class="..."/>
  </x:expect>
Case 3: Executing an Extension Instruction
Substituting for extension instructions requires a little more work than substituting for extension functions. The goals are similar, however:
-
Avoid an XSpec error.
-
(Optionally) Report that the instruction would be executed in production.
-
(Optionally) Return a mock value to use for verification.
The extension instruction that schedules asynchronous calls to a named template is particularly challenging to integrate with XSpec, and we discuss that in this section.
Goal 1: Avoid Error
We did not have any cases where avoiding an error was the only
goal of substituting for an extension instruction. If we did, we would have used a
try/catch structure with an empty <xsl:catch/> element, or a
use-when attribute.
Goal 2: Report on Production Behavior
The <ixsl:set-style> extension instruction sets style properties on an
object. Depending on your application's use of this instruction, you might want to
obtain
mock results or merely report what happens in production. In our case, the latter
is
sufficient.
Using an approach similar to how we handled <xsl:result-document>, we
created a named template that, in production, does nothing but execute
<ixsl:set-style>. The production XSLT transform consistently calls this
named template instead of executing <ixsl:set-style> directly. The purpose
of this named template is to provide a level of indirection that enables substitution
for
testing purposes.
Figure 14: Production XSLT Transform's Wrapper for <ixsl:set-style>
  <!-- Set specified object to specified style. -->
  <xsl:template name="mt:set-style" as="empty-sequence()">
    <xsl:param name="stylename" as="xs:string"/>
    <xsl:param name="stylevalue" as="xs:string"/>
    <xsl:param name="object"/>
    <ixsl:set-style name="{$stylename}" select="$stylevalue"
    object="$object"/>
  </xsl:template>
Our chosen substitute behavior is to emit a processing instruction that says what
happens in
production. The next code excerpt shows the test utility file's code for the
mt:set-style template.
Figure 15: Test Utility File's Substitution for <ixsl:set-style>
  <xsl:template name="mt:set-style">
    <xsl:param name="stylename" as="xs:string"/>
    <xsl:param name="stylevalue" as="xs:string"/>
    <xsl:param name="object"/>
    <xsl:processing-instruction name="tst" expand-text="yes">Set object's
      {$stylename} style to {$stylevalue}</xsl:processing-instruction>
  </xsl:template>
During XSpec testing, any XSLT code that calls the mt:set-style template
executes the testing version, avoiding an XSpec error and providing some verifiable
information. The following <x:expect> element illustrates how XSpec can
confirm our expectations about a style change that the production XSLT transform makes.
In
this case, the processing instruction about the style change happens to be the first
processing instruction in the XSLT
result.
Figure 16: XSpec File's Verification Relying on Mock <ixsl:set-style>
  <x:expect label="Doc survey was hidden temporarily."
    test="$x:result[self::processing-instruction()][1]">
    <?tst Set object's visibility style to hidden?>
  </x:expect>
Goal 3: Return Mock Result for Verification
The <ixsl:set-attribute> extension instruction sets an attribute on
the context node in the HTML DOM. Once again, depending on your application's use
of this
instruction, you might want to obtain mock results or merely report what happens in
production. In our case, we chose to obtain mock results.
We created a named template, mt:set-attribute. In production, this
template behaves and is used like the mt:set-style template described
earlier.
Figure 17: Production XSLT Transform's Wrapper for
<ixsl:set-attribute>
  <!-- In context node (presumed to be in HTML DOM),
  set specified attribute to specified value. -->
  <xsl:template name="mt:set-attribute" as="empty-sequence()">
    <xsl:param name="attrname" as="xs:string"/>
    <xsl:param name="attrvalue" as="xs:string"/>
    <!-- XSpec override also has html_el parameter. -->
    <ixsl:set-attribute name="{$attrname}" select="$attrvalue"/>
  </xsl:template>
Our chosen substitute behavior in the XSpec environment is to produce an element with
the specified attribute set to the specified value. The next code excerpt shows the
test
utility file's code for the mt:set-attribute template. It uses an additional
parameter, html_el, that acts as a mock context node.
Figure 18: Test Utility File's Substitution for <ixsl:set-attribute>
  <!-- Mimic setting the specified attribute on the HTML element passed in. -->
  <xsl:template name="mt:set-attribute">
    <xsl:param name="attrname" as="xs:string"/>
    <xsl:param name="attrvalue" as="xs:string"/>
    <xsl:param name="html_el" select="." as="element()"/>
    <xsl:if test="exists($html_el)">
      <xsl:element name="{local-name($html_el)}"
        namespace="{namespace-uri($html_el)}">
        <xsl:attribute name="{$attrname}" select="$attrvalue"/>
        <xsl:copy-of select="$html_el/@*[not(name()=$attrname)]"/>
        <xsl:copy-of select="$html_el/node()"/>
      </xsl:element>
    </xsl:if>
  </xsl:template>
During XSpec testing, any XSLT code that calls the mt:set-attribute
template executes the testing version, avoiding an XSpec error and mimicking the
production behavior. Because the XSpec file for this web application defines a
representative html_el parameter, we can verify that a particular element has
a particular attribute set.
Figure 19: XSpec File's Verification of an Operation Relying on Mock
<ixsl:set-attribute>
  <x:call template="mt:top_nav_targets">
    <x:param name="html_el" select="[...]"/>
    <x:param name="configuration" select="[...]"/>
  </x:call>
  <!-- The mt:set-attribute template's XSpec override
  returns the modified li element. -->
  <x:expect label="Functions button has class attr to mark it as active"
    test="exists(//li[@class = 'crux_resource active']/a[. = 'Functions'])"/>
The advantage of mimicking the production behavior is that, in isolation, it is
somewhat more realistic than merely reporting what happens in production. But in a
way, it
can be less realistic when combined with the other behaviors of the
template or function you are testing. The browser behavior is to modify an HTML element
in
place, not to create a duplicate element with the new attribute value. If your template
called mt:set-attribute twice in succession to set different attributes, the
output to test for would be two modified elements: one with the first attribute and
one
with the second attribute. When testing your own application, you can decide whether
your
testing needs are better served by an indication of the production behavior, this
particular way of mimicking the production behavior, or something else.
Additional Challenges in Scheduling Template Calls
The <ixsl:schedule-action> extension instruction schedules a call to a
named XSLT template. Scheduling the call, instead of executing it immediately, is
useful
because it lets the browser regain control and render whatever results it has so far.
As
with other interactive XSLT extension instructions, XSpec does not recognize
<ixsl:schedule-action>. XSpec cannot schedule actions for later
execution. Beyond that, this instruction presented some additional challenges for
XSpec
testing.
The first challenge was executing one behavior in production and a substitute behavior
in the test environment. The content of <ixsl:schedule-action> is
restricted to one <xsl:call-template> instruction. A thin wrapper similar
to the ones around <xsl:result-document> and
<ixsl:set-attribute>, described earlier, would not support arbitrary
template calls having arbitrary template parameters. On the other hand, if the wrapper
around <ixsl:schedule-action> were complicated, the complexity would be
located in the production XSLT transform. That extra complexity in
production seems undesirable, especially if one purpose of using
<ixsl:schedule-action> is to make the web application run faster.
As an alternative to the wrapper approach, we use <xsl:try> and
<xsl:catch>. In production, the <xsl:try> block executes
<ixsl:schedule-action> successfully, assuming there is no unintended
error condition. In XSpec, the <ixsl:schedule-action> instruction cannot
execute, and the processor falls back to the <xsl:catch> block. The
<xsl:catch> block produces the desired substitute behavior. This
structure achieves the goal of varying the behavior in production and the test
environment, albeit with the disadvantage of requiring some test-oriented XSLT code
to be
located in the production XSLT file.
In some situations, we make the <xsl:catch> block call the same
template named in the scheduled action. In the next example, the content of
<ixsl:schedule-action> is identical to the content of
<xsl:catch>. That way, calling the template that contains this
<xsl:try> element returns the same content in the browser as in the
XSpec environment, although the manner of returning the content is different.
Figure 20: Production XSLT Transform Excerpt Where Fallback Behavior Mimics
<ixsl:schedule-action>
  <!-- Add capability filter to left navigation area. -->
  <xsl:try>
    <ixsl:schedule-action wait="1">
      <xsl:call-template name="mt:extcap_filter">
        <xsl:with-param name="configuration" select="$configuration"/>
      </xsl:call-template>
    </ixsl:schedule-action>
    <xsl:catch>
      <xsl:call-template name="mt:extcap_filter">
        <xsl:with-param name="configuration" select="$configuration"/>
      </xsl:call-template>
    </xsl:catch>
  </xsl:try>
A second challenge for <ixsl:schedule-action> involves a looped series
of actions, where each action schedules the next action. In effect, XSpec can get
stuck
executing the loop recursively, although the browser executes the loop serially with
no
problem. Here is how that can happen. One behavior of our web application involves
listing
software language items across many products. The production XSLT transform contains
a
named template that creates the list for the first product, and then uses
<ixsl:schedule-action> to call the same template recursively for the
next product. In the browser, the application computes the first product's list, schedules
the next template call, returns from the XSLT transform and renders the first product's
list, and then eventually re-enters the XSLT transform to compute the second product's
list. In particular, in the browser, the scheduled call executes after the end of
the
prior call; in effect, the template executes many times serially. Outside the browser,
however, the template's <xsl:catch> block executes during the template's
execution. If the <xsl:catch> block mimics the browser behavior by
actually calling the same template as in the <ixsl:schedule-action> child,
the template executes recursively. The try/catch structure interferes with tail recursion
and makes the recursion unsustainable.
In this situation, instead of making the <xsl:catch> block call the
same template recursively, we make the block merely report what happens in
production.
Figure 21: Production XSLT Transform Excerpt Where Fallback Behavior Reports on
<ixsl:schedule-action>
  <!-- Schedule processing for next product -->
  <xsl:try>
    <ixsl:schedule-action wait="1">
      <xsl:call-template name="mt:content_area_aboveproduct_block">
        <xsl:with-param name="configuration" select="$configuration"/>
        <xsl:with-param name="index" select="$index + 1"/>
      </xsl:call-template>
    </ixsl:schedule-action>
    <xsl:catch>
      <xsl:processing-instruction name="tst">In production, would schedule next call to
      mt:content_area_aboveproduct_block, for product
      '<xsl:value-of select="$product_html_paths[$index +1]"/>'</xsl:processing-instruction>
    </xsl:catch>
  </xsl:try>
Making the XSpec behavior nonrecursive was not ideal, as it increased the gap between the browser behavior and the test environment behavior.
Alternate Approach: Use the Browser
This section describes an alternative to the preceding discussion of making XSpec test scenarios runnable in Saxon-EE. Given that the Saxon-JS web application runs XSLT in a browser, it is natural to ask whether an XSpec test scenario can use a browser to run the web application being tested. Running the web application in the browser reduces the need for substitution and might remove that need altogether. Hypothetically, the browser could also render the report of XSpec results. This section describes how such an approach might work. An important caveat in this discussion is that we did not actually code the necessary XSpec infrastructure modifications. Perhaps someone will be inspired to add an enhancement like this to the XSpec infrastructure, which is open source. For our immediate exploratory purpose, we manually coded or modified certain files that would be generated by the XSpec compiler if the browser-based approach were an implemented feature. The examples use a simple application instead of our actual case study.
Simple Example
Consider a simple Saxon-JS application that operates on an HTML page whose body contains an unordered list.
Figure 22: Body of HTML Document for Application
<body>
  <h1>My App</h1>
  <p>Here is a list.</p>
  <ul>
    <li><span>First item</span></li>
    <li><span>Second item</span></li>
    <li><span>Third item</span></li>
  </ul>
</body>
Suppose you have an XSLT template that highlights one of the list items by coloring
its
text red and its background yellow. To demonstrate multiple approaches, the template
uses
both the <ixsl:set-style> and <ixsl:set-attribute> extension
instructions.
Figure 23: XSLT Template to Test
<xsl:template name="mt:adjust_color">
<xsl:param name="index" as="xs:integer" select="xs:integer(1)"/>
<xsl:for-each select="ixsl:page()//ul/li[position()=$index]/span">
<ixsl:set-style object=".." name="background-color" select="'yellow'"/>
<ixsl:set-attribute name="style" select="'color:red;'"/>
</xsl:for-each>
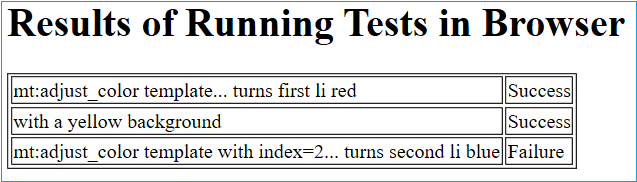
</xsl:template>Consider the following XSpec test scenarios for the mt:adjust_color
template. The last <x:expect> element's assertion is false, because the text
turns red, not blue.
Figure 24: XSpec Scenarios to Test XSLT Template
  <x:scenario label="mt:adjust_color template">
    <x:call template="mt:adjust_color"/>
    <x:expect label="turns first li red"
      test="ixsl:style(ixsl:page()//ul/li[1]/span)?color"
      select="'rgb(255, 0, 0)'"/>
    <x:expect label="with a yellow background"
      test="ixsl:style(ixsl:page()//ul/li[1])?background-color"
      select="'rgb(255, 255, 0)'"/>
  </x:scenario>
  <x:scenario label="mt:adjust_color template with index=2">
    <x:call template="mt:adjust_color">
      <x:param name="index" select="2"/>
    </x:call>
    <x:expect label="turns second li blue"
      test="ixsl:style(ixsl:page()//ul/li[2]/span)?color"
      select="'rgb(0, 0, 255)'"/>
  </x:scenario>
In the existing architecture for an XSpec test suite for an XSLT transform, the XSpec infrastructure compiles your XSpec file into a generated XSLT file that imports the XSLT stylesheet you are testing, runs your code according to the test scenarios, and compares the results with your expectations. The XSpec infrastructure also formats the results into an HTML report. In this example, we envision an enhanced XSpec infrastructure using multiple files:
-
XSLT file, which runs your code according to the test scenarios, compares the results with your expectations, and returns pass/fail information. This file is similar to the one the actual XSpec compiler now creates for non-browser XSLT transforms. In a full implementation, this file would be generated from the XSpec test file, but in this example, it was manually modified based on the actual XSpec compiler's output.
-
Stylesheet export file, which Saxon-EE compiles from the XSLT file in item A. This file is always generated.
-
JavaScript file, which invokes Saxon-JS multiple times to run the stylesheet export file in item B, using a well-defined calling sequence described later in this section. This JavaScript file also invokes Saxon-JS again to format the test results in the browser. In a full implementation, this JavaScript file would be generated from the XSpec test file, but in this example, it was coded by hand.
-
HTML file that you open in a browser whenever you want to execute your XSpec test suite and display a report of the results. This HTML file is similar to the real application's HTML file. In particular, it contains the same document markup that the web application looks for (such as
<li><span>First
                                 item</span></li>
in our example). A key difference between this HTML file and the real application's HTML file is that this HTML file references the JavaScript file in item C, instead of calling Saxon-JS to run the production XSLT transform.If variations in the production HTML files for Saxon-JS web applications make it impractical to generate this HTML file, perhaps test developers would create and maintain it manually.
While developing this example, we wanted to explore how closely we could align with
the
existing XSpec infrastructure. We found that the mapping of basic XSpec code units
(scenarios and assertions) to compiled code units could be the same, but the way the
units
of compiled code call each other had to be different. For a simple XSpec file structured
as
in this example, the existing XSpec compiler produces one named template per scenario
and
one additional named template per <x:expect> assertion. Such a mapping works
well in this example. However, whereas the existing XSpec compiler checks the assertions
immediately after running the scenario, the test for the Saxon-JS application should
let the
browser regain control and render the scenario behavior before the test starts to
check
assertions. In other words, you should not run the code being tested and check assertions
in
the same transform operation.
In Saxon-JS version 1.2, the SaxonJS.transform method, which invokes
Saxon-JS, lets you specify a callback function that executes when the browser regains
control after processing an XSLT transform. Typically, this callback function is a
suitable
vehicle for calling Saxon-JS again to check the assertions (although scheduled template
calls would pose challenges, just as in the mocking approach). In the JavaScript code
sample
below, the functions named scenario1assertions, scenario2,
scenario2assertions, and scenario2done are all callback
functions for invocations of SaxonJS.transform. Note that
SaxonJS.transform does not support this callback syntax in Saxon-JS version
2; the same underlying requirement can probably be satisfied using different syntax,
but we
did not pursue that.
Another question that arose during development of this example was how different parts
of the process would transfer data, without writing intermediate files for a subsequent
step
to read. What data does the transform that checks assertions need to obtain from the
transform that executed the parent scenario? How do we store results of each assertion
so we
can later format the report of the results? Or can we avoid the need for storage by
incrementally building the report? Our approach in this example uses an XSLT global
parameter ( slabel, for scenario label) to transfer data from the scenario
transform to the corresponding assertion transform. Also, the example uses the
<xsl:message> instruction to transfer data from XSLT back to JavaScript.
When running each assertion, the XSLT outputs the results as a message that the JavaScript
code captures using the deliverMessage option that is part of the
SaxonJS.transform method. The messages from various assertions accumulate in
a JavaScript variable named alltestresults, whose content is eventually passed
to the code that formats the report.
Figure 25: JavaScript Code Calling Saxon-JS (Version 1.2) to Run Tests and Report Results
var alltestresults = ""; // Results from xsl:message in assertion transforms
var testsef = "unittest/browser_based_attribute_test-generated.sef";
window.onload = function scenario1() { // Run scenario 1.
  SaxonJS.transform(
    {
     stylesheetLocation: testsef,
     initialTemplate: "Q{http://www.jenitennison.com/xslt/xspec}sc1",
     deliverMessage: function(msg) { slabel = msg + '...'; }
    },
   function scenario1assertions() { // Check assertions from scenario 1.
     SaxonJS.transform(
       {
        stylesheetLocation: testsef,
        initialTemplate: "Q{http://www.jenitennison.com/xslt/xspec}sc1ex1",
        templateParams: {
          "Q{http://www.jenitennison.com/xslt/xspec}slabel": slabel
        },
        deliverMessage: function(msg) { alltestresults += msg + '\n'; }
       },
       function scenario2() { // Run scenario 2, including setup.
         SaxonJS.transform(
          {
           stylesheetLocation: testsef,
           initialTemplate: "Q{http://www.jenitennison.com/xslt/xspec}sc2",
           deliverMessage: function(msg) { slabel = msg + '...'; }
          },
         function scenario2assertions() { // Check assertions from scenario 2.
           SaxonJS.transform(
             {
              stylesheetLocation: testsef,
              initialTemplate: "Q{http://www.jenitennison.com/xslt/xspec}sc2ex1",
              templateParams: {
                "Q{http://www.jenitennison.com/xslt/xspec}slabel": slabel
              },
              deliverMessage: function(msg) { alltestresults += msg + '\n'; }
             },
             function scenario2done() { // Display all results in HTML body.
               mytext = "<root>" + alltestresults + "</root>";
               modifiedformatter = "framework_xspec_modified/" +
                  "src/reporter/format-xspec-report.sef";
               SaxonJS.transform(
                 {
                  stylesheetLocation: modifiedformatter,
                  sourceText: mytext,
                  initialTemplate: "xspec_for_saxonjs"
                 }
               ) // end of SaxonJS.transform() for report formatting
             } // end of scenario2done fcn
           ); // end of SaxonJS.transform() for assertions from scenario 2
         } // end of scenario2assertions fcn
        ); // end of SaxonJS.transform() for scenario 2
       } // end of scenario2 fcn
     ); // end of SaxonJS.transform() for assertions from scenario 1
   } // end of scenario1assertions fcn
  ); // end of SaxonJS.transform() for scenario 1
} // end of scenario1 fcn
When you open the HTML file for this example in a browser, it briefly flashes the first two screens below to run the two scenarios, and then settles on the report.
Figure 26: Running Scenario 1
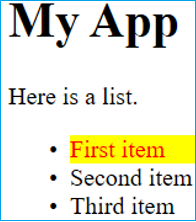
Figure 27: Running Scenario 2
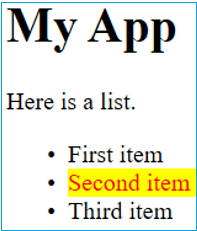
Figure 28: Report of Results
Some Ingredients for Browser-Based Approach
Extrapolating from the example, we conjecture that browser-based XSpec testing for Saxon-JS applications might require the following ingredients. This list is not comprehensive.
-
The XSpec infrastructure must produce not only an XSLT file, but also a corresponding stylesheet export file and a JavaScript file that invokes Saxon-JS. The invocations of Saxon-JS must be arranged to ensure dependent processes occur in the correct sequence. Separate invocations must transfer data from scenarios to their assertions and from assertions to the report generator. Nested scenarios, if they are to be supported as in the non-browser-based XSpec approach, need to be handled in some appropriate way that we have not investigated.
-
The XSpec compiler must generate an XSLT file whose calling structure differs from the one the compiler currently generates. To avoid running the code being tested and checking assertions in the same transform operation, the generated XSLT template for a scenario cannot call the templates corresponding to assertions. Instead, the calls to check assertions should be initiated from JavaScript, and initiated only after the scenario transform is known to have completed. Another change in the calling structure in the compiled XSLT file is to have each assertion-checking template call the next one in a given scenario, because the scenario-running template is not going to do it.
-
If the implementation uses the
deliverMessageoption as this example does, then another change in the XSpec compiler involves using the<xsl:message>instruction only for the exact data we want to capture and pass downstream. To avoid interference from<xsl:message>instructions in the XSLT code being tested, it would be useful to look for alternatives todeliverMessageor more robust ways to use it. -
Either the XSpec infrastructure must produce an XSpec-oriented HTML file, perhaps derived from the real application's HTML file, or the documentation must describe how the test developer should create the XSpec-oriented HTML file.
-
The XSpec report formatting code needs minor changes to create the rudimentary report shown in this example. To create a report closer to what XSpec currently produces for non-browser XSLT transforms would require more work in both the compiler and the report formatter.
-
In general, supporting multiple scenarios in one XSpec file requires some way of restoring the web application to a known state between successive scenarios — or enabling the test developer to restore it. If test developers are responsible for restoring the state, they might need enhancements in the XSpec schema to indicate setup or cleanup code. A scenario that calls setup or cleanup code without making any assertions might suffice, in a pinch, but it would be better to mark setup or cleanup code explicitly. One possibility is to make the XSpec schema allow something like
<x:setup-call template="my_named_template_for_setup"/>or<x:cleanup-call template="my_named_template_for_cleanup"/>at the beginning or end, respectively, of a scenario. The compiler would need to call the specified templates from the generated XSLT. -
Capturing results programmatically, rather than just displaying them, would be desirable and would require infrastructure modifications. The example here does not include a way to capture results programmatically.
-
If it is possible to get code coverage data from Saxon-JS, reporting on code coverage would also require infrastructure modifications.
Benefits and Costs
Benefits and Costs of Mocking Approach
In our experience, benefits of the mocking approach include:
-
Simplicity. The templates and functions in our XSpec test harness are all fairly short and simple. In most of the cases where we used mocking, we planned for that architecture early in the development process, which reduced the need to refactor code afterward.
-
Immediate availability. The approach does not require enhancements in either XSpec or Saxon-JS.
-
Potentially faster execution of tests. Substitute behaviors can run faster than the actual browser behaviors.
Costs of the mocking approach include:
-
Testing design work. We had to decide what the substitute behavior should be and where complementary testing layers, such as JavaScript tests or interactive tests, were needed to check functionality that required substitution in the XSpec environment.
-
Some loss of fidelity. The behavior in the test environment is necessarily different from the behavior in production. If bugs go unnoticed due to those differences, we might find that our tests pass but the actual web application does not behave correctly.
Benefits and Costs of Browser Approach
Benefits of the browser approach include:
-
Higher fidelity. The way the browser executes test scenarios is similar to how it executes the web application. The greater realism of the browser-based approach might have been important if our application involved a lot of interaction between XSLT and JavaScript.
Costs of the browser approach include:
-
Need for XSpec infrastructure enhancements. The prototype shown here was coded manually for exploratory purposes, not generated by the XSpec compilation and reporting infrastructure currently on GitHub. Modifying the XSpec infrastructure to support the browser-based approach described in this paper would likely require significantly more design and implementation work than using the mocking approach.
-
Unclear limitations. We have not pursued this approach enough to know where the realism of the browser-based approach would fall short, either in a particular application or in an effort to implement the approach generically. For example, if an application relies heavily on client system events, how do you simulate an event well enough to test the event handler? If an application relies heavily on asynchronous, scheduled template calls, when do you verify results and how do you know when the template calls are complete?
-
Potentially slower execution of tests. The cost of higher fidelity is needing to wait for the browser to execute your test scenarios, including setup code, cleanup code, and rendering. Delays can make the development process less agile.
Our Decision and Results
Hypothetically, if the XSpec infrastructure already supported the browser-based approach described in this paper, along with automated reporting of test results and code coverage, that approach would have been compelling. Given the current reality of XSpec infrastructure, we chose the mocking approach for our web application. The simplicity and immediate availability of the mocking approach fit the project's schedule. Being able to check more than 400 assertions in under seven seconds within the XSLT development environment makes it easy to run tests repeatedly while changing the code. The gaps left by mocking were small relative to the overall functionality. The development team included a test developer with JavaScript testing skills, so the XSLT developer and test developer collaborated to identify gaps to fill using JavaScript tests. We plan to use the mocking approach in other near-term Saxon-JS projects.
References
[F] Feathers, Michael C. Working Effectively with Legacy Code. Prentice Hall: Upper Saddle River, N.J., 2005.
[M] MathWorks documentation, "Reference List - MATLAB & Simulink" (sample URL), https://www.mathworks.com/help/matlab/referencelist.html?type=function&category=2-and-3d-plots
[S1] Saxon-JS documentation, "About Saxon-JS," http://www.saxonica.com/saxon-js/documentation/index.html#!about
[S2] Saxon-JS documentation, "Result Documents," http://www.saxonica.com/saxon-js/documentation/index.html#!browser/result-documents
[S3] Saxon-JS documentation, "Extension functions," http://www.saxonica.com/saxon-js/documentation/index.html#!ixsl-extension/functions
[XS] XSpec. https://github.com/xspec/xspec